How To Start Tiling A Shower Wall

2018 Img Q2 Hi Res Rights Fio Creative Photo Cara Alyn Interiors Web Hi Resolution Bathroom Shower S Bathroom Wall Tile Bathroom Shower Walls Bathrooms Remodel

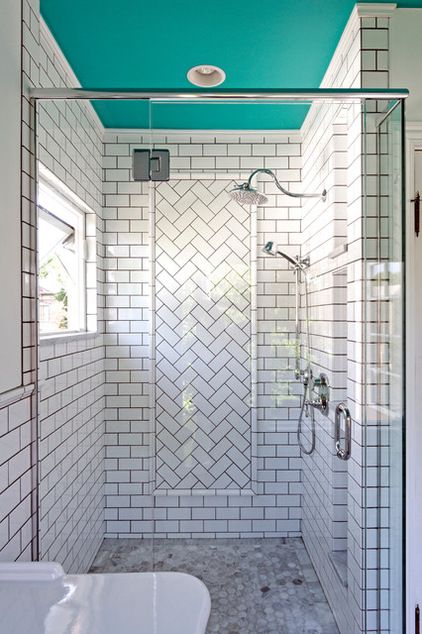
Pin By The Tile Shop On Diy Tile Diy Tile Shower Shower Tile Bathroom Makeover

12 X24 Tile Layout Bathtub Tile Tile Layout Bathroom Remodel Shower

Complete Re Do Of My 80 Main Bath Let The Demo Begin White Bathroom Tiles Bathroom Shower Tile Bathroom Wall Tile

Part 1 How To Tile 60 Tub Surround Walls Preparation Where To Start Tiling Tile Layout Bathtub Walls Bathtub Wall Surround Bathroom Shower Walls

Cream Tile Shower Walls Large Shower Tile Tile Walk In Shower Shower Niche
Mark where to set your first row.
How to start tiling a shower wall.

How Does This Shelf Do For Water Retention And Mold Risk Linear Light Gray Shower Wall Tile With Hexagon Mosa In 2020 Shower Wall Tile Shower Tile Subway Tile Showers

How To Tile A Bathroom Shower Walls Floor Materials 100 Pics Pro Tips Shower Wall Shower Tile Bathroom Shower Walls

How To Install Tiled Shower Walls With A Prefab Base Fiberglass Shower Pan Shower Pan Installation Fiberglass Shower

15 Bathrooms That Have Been Transformed With Wood Tile Wood Tile Shower Farmhouse Shower Shower Tile

Everything From Lowe S Shower Walls 6x24 Leonia Silver Porcelain Floor Delfino Arctic Topaz Pebble Bathroom Shower Tile Shower Remodel Bathrooms Remodel

Small 36x36 Shower Decided To Use 12x24 Tile Small Tile Shower Tile Bathroom Shower Tile

See Great Bathroom Shower Remodel Ideas From Homeowners Who Have Successfully Tackled This Bathroom Remodel Shower Pebble Tile Shower Pebble Tile Shower Floor

Plumbing Parts Plus Shower Wall Tile Subway Tile Showers Shower Wall Panels

Invoke 6x24 Mystic Way Wall Tile With Marvel Opal Listello Shower Wall Tile Bathroom Design Shower Tile

Gray Tiled Shower With Square Tile Shower Floor And White Accent Tile Niche Gray Shower Tile Bathroom Shower Tile Bathroom Shower Walls

5 Tips For Choosing Bathroom Tile Tile Bathroom Bathroom Tile Designs Shower Floor Tile

Things That Sparkle Renovation Updates Shower Tile Shower Design Bathrooms Remodel

Eramosa Porcelain Tiles Bathroom Wall Tile Bathroom Floor Tiles Shower Tile

This Polished White Marble Tile Livens Up The Walls And Floors In Your Bathroom Baths Sho Ceramic Tile Bathrooms Luxury Bathroom Tiles Patterned Bathroom Tiles

Bathroom Shower Wall Tile Classico Beige Porcelain Wall Tile Bathroom Shower Walls Bathroom Remodel Shower Bathroom Shower Tile

Shower Tile 3x12 Hand Made White Crackled Ceramic Tile Shower Tile 3x12 Hand Made White Crackled Tile Glo Bathroom Shower Design Shower Tile Bathrooms Remodel

12x12 Shower Wall Tile Lit Up Your Bathroom With Beautiful Shower Wall Tile Interior Design Shower Wall Tile Shower Remodel Patterned Bathroom Tiles

White Subway Tile Shower And Niche With Dark Grout White Subway Tile Shower Subway Tile Showers Subway Tile Shower Niche
1

Msi Photo Gallery Bathroom Remodel Shower Bathroom Tile Designs Shower Remodel

Diy How To Tile Shower Surround Walls Shower Tile Shower Wall Tile Shower Surround

How To Compare Ceramic Tile Surrounds Vs Laminate Shower Wall Panels Shower Wall Panels Tub To Shower Remodel Bathtub Shower Remodel

Spruce Up Your Shower By Adding Pebble Tile Accents Click The Pin To Get Started On Your Next Bathroom Remodeling Shower Remodel Shower Tile Bathrooms Remodel

3x6 Subway Tile Shower Walls Paired With 2x2 Octagons And Gray Dots Floor Shower Surround Bathtub Tile Bathtub Surround

Elegant Aqua Tiled Shower In 2020 Shower Tile Aqua Tiles Shower Wall

Tiling A Shower Wall With Large Tiles Revolumbi Info Large Shower Tile Shower Tile Large Tile Bathroom

Simple Walls And Floor With Fancy Shower Floor It S A Small Area And You Can Take Some Chances Farmhouse Shower Shower Wall Tile Shower Remodel

April Foster Definitely By Christmas Part 2 Tile Tub Surround Subway Tiles Bathroom Bathroom Wall Tile

White Large Format Field Tile From Art Tile In Oakland To Be Used For Shower Walls In Same Vertical P Large Shower Tile White Bathroom Tiles White Tile Shower

Shower Subway Tiles These Are The 4x8 American Olean Tiles From Lowes They Are Called Starting Line Subway Tile Showers Olean Bathrooms Remodel

20 Fabulous Shower Bathroom Ideas That Steal Your Focus Small Bathroom Tiles Shower Makeover Glass Tile Shower

Brown And Beige Tile Shower Wall And Floor Beige And Grey Tile Accent Brown Tile Bathroom Brown Tile Shower Beige Tile Bathroom
Room Of The Day A Splash Of Turquoise In A Vintage Inspired Bath Bathrooms Remodel Painted Ceiling Bathroom Design

Coastal Spa Shower Shower Wall Tile Wood Tile Shower Shower Tile

Part 2 How To Tile Shower Stall Or Tub Walls Where To Start Shower Surround Tiles Installation Shower Surround Shower Tile Tub Tile

Freshen Up Your Bathroom In 2017 With This Mixed Tile Trend Beautiful Bathrooms Bathroom Inspiration Amazing Bathrooms

Large 24x24 Porcelain Shower Wall Tile Shower Wall Tile Large Tile Bathroom Large Shower Tile

24x48 Porcelain Tile Large Shower Tile Shower Tile Porcelain Tile Bathroom

Hexagon Tile Shower Floor White Tile Shower White Tile Shower Shower Floor Shower Wall Tile

Grey Standing Mosaic Tile Master Bathroom Shower Pebble Tile Bathroom Shower

Subway Tile Modern Farmhouse Dog Shower Mudroom Boot Wash Pebble Tile Rock White Walls Shower Remodel Farmhouse Shower Small Shower Remodel

How To Prepare A Shower Alcove Or Bathtub Walls For Tile Using Cement Backerboard And Attending To Important Waterproof Shower Alcove Bathtub Walls Shower Tile

Shower Walls Asturia 12 X 24 Azul Accent Titan Interlocking Mosaic Glass Shower Enclosure In 2020 Bathroom Shower Walls Bathroom Shower Design Dark Tile Shower
3
Source : pinterest.com
